How to retouch facial acne with Photoshop
How To Remove Acne & Blemishes In Photoshop
Removing pimples in Photoshop can be done in different ways. In today’s face spotting tutorial, we will talk about Spot Healing Brush, Healing Brush, Patch Tool, Clone Stamp Tool, and Skin Smoothing filter. Choose any of these methods that are easier for you and make your photos more beautiful.
Teaching how to remove pimples in Photoshop with the Spot Healing Brush tool
The Spot Healing Brush tool is basically a texture replacement tool. You remove damaged or blemished tissue and replace it with healthy tissue from another area of the skin. Then the good texture is combined with the original tone and color of the problem area to create a more integrated result. While the Healing Brush forces us to select the fine texture ourselves, the Spot Healing Brush tool selects the texture on its own, which makes it much faster to use.

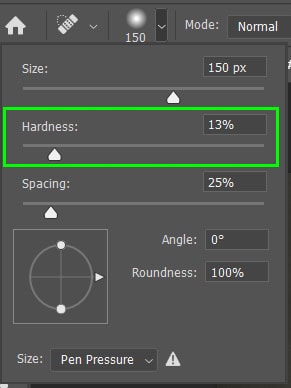
It is necessary to note that this tool is suitable for removing small and separate stains and pimples. When using this tool, you can change the hardness of the brush depending on the amount of fill effect you want. The softer the brush, the easier the area will blend with the surrounding area.
When using this brush, you can choose from Content-Aware, Create Texture, and Proximity Match options.
![]()
The Content-Aware option provides the best results when Photoshop searches for the best sample area.
The Create Texture option works by creating a textured pattern based on the surrounding pixels. When using this option on skin tone, a blurred appearance is created.
The Proximity Match option uses pixels that directly surround the selected area to replace the pixels. This option works when the spots are separated from each other.
Finally, when you are retouching a photo that has multiple edits on different layers, select Sample All Layers. This option retouches the area while preserving the edits previously made to the image.
![]()
The problem with the Spot Healing Brush is that it has less control over the pixels that replace the damaged area. When using this tool, you cannot choose the color, brightness, and shadow for the replacement pixels. Lack of control over the sampled pixels may cause errors in the retouching process.
How to remove facial acne in Photoshop with Spot Healing Brush
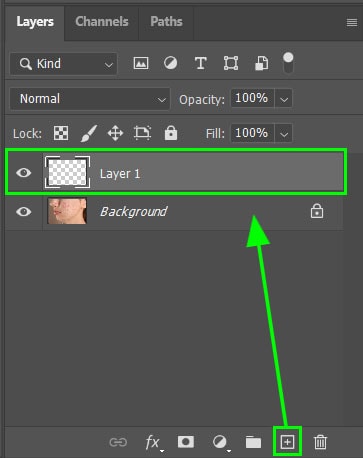
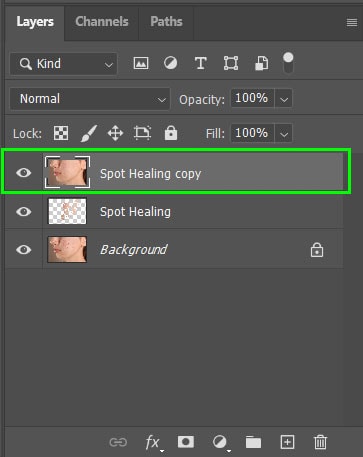
Step 1: Open your photo in Photoshop and create a blank layer from the Layers panel. This is because the original image does not change. By holding the Alt key in Windows and Option in Mac and clicking on the Add New Layer icon, a new layer will be added to the top of the photo.

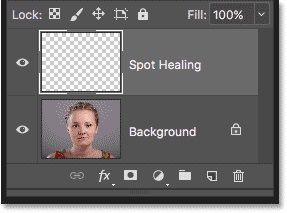
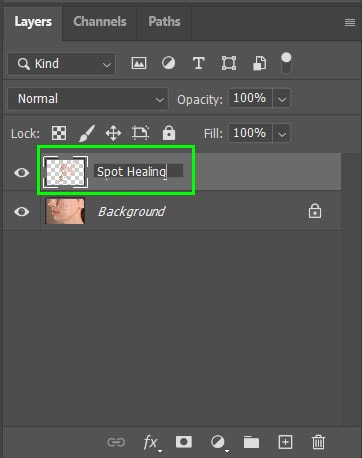
Name the new layer Spot Healing and then click OK.

The Spot Healing layer should be placed above the Background layer.
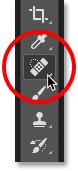
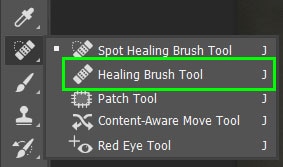
Step 2: We need to select the Spot Healing Brush tool from the toolbar.
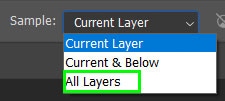
Step 3: In this step, we select the Sample All Layers option. This allows the Spot Healing Brush tool to use not only the currently selected layer (ie the Spot Healing layer) but also the layer below (ie the Background).

Step 4: Now we have to select Content-Aware. In the Option Bar, make sure the Type is set to Content-Aware. This allows Photoshop to make a smarter choice when choosing an alternate texture.

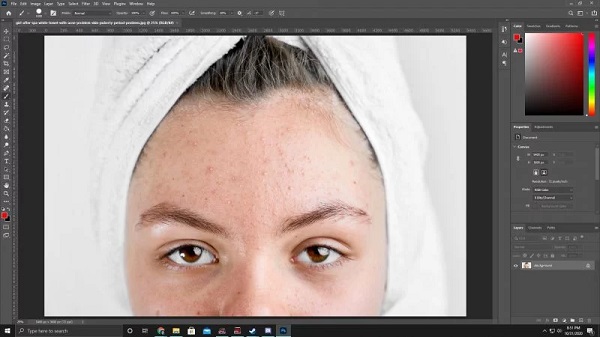
Step 5: Using the Spot Healing Brush tool, click on pimples and other minor skin blemishes to quickly remove them. For better results, choose the size of your brush slightly larger than the spots and pimples. To change the brush size using the keyboard, press the [ key to making the brush smaller or use the ] to make your brush size bigger. Now, by moving the brush over the stains, you can easily remove them.


Another way to use this tool is as follows:
We open the photo we have in Photoshop. To do this, you can right-click on your photo file and select Open With Photoshop, or open the Photoshop program and select Open from the File menu.
When the photo is opened in Photoshop, we select the Spot Healing Brush Tool from the tool menu on the left. Set the Hardness to 100% and select the Sample All Layers option.
Now create a new transparency layer. Doing this ensures that you still have your original photo intact when you make a mistake. To add a new layer, select Layer from the menu and go to New>Layer.
Make sure New Layer is selected from the Layers panel on the right. Then, very simply, use the Spot Healing Brush tool to remove the spots you want.
Tips that you should pay attention to when removing facial acne in Photoshop
If you want to cancel a move, you can do it by pressing Ctrl+Z on Windows or Command+Z on Mac. If necessary, change the size of the brush and repeat to remove the pimples.
You can access the Spot Healing Brush tool by pressing the J key.
If the areas of the skin have larger pimples, it is difficult to clean these areas for the first time. Therefore, first act on small pimples that are separate from the rest. Then instead of trying to paint a larger area all at once with one brush stroke, break it up into smaller sections and work your way from the outside to the inside of the area.
Use a smaller brush size and short clicks to remove areas with continuous seams.
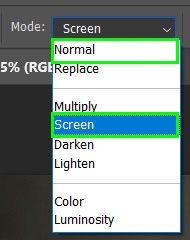
When retouching skin with the Spot Healing Brush tool, you will often get better results by changing the brush blending mode from Normal (default) to Lighten. You can find the Blend Mode option in the Options Bar.
Using Lighten, Photoshop only replaces pixels that are darker than the good texture. If the spot is lighter than the normal skin color, you can select the Darken mode from the Mode menu.
To quickly switch between blending modes for the Spot Healing Brush, press and hold the Shift key on your keyboard, then press the + or – key.
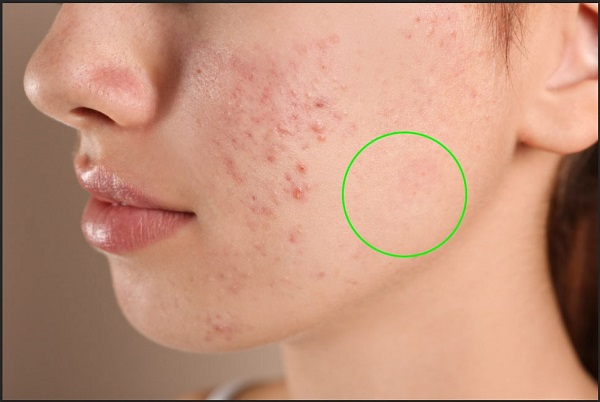
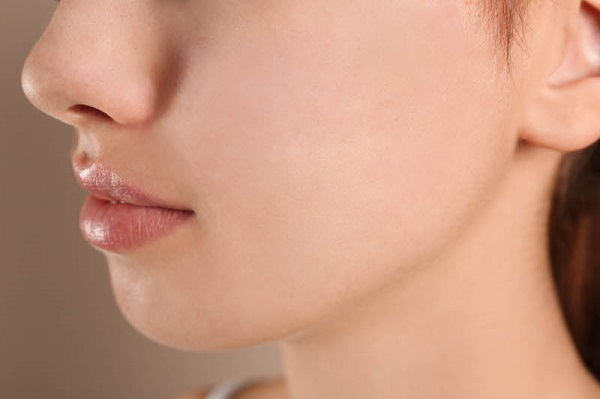
The photo below is the result of facial acne removal with Photoshop, which you can compare with the original photo.
How to remove facial acne in Photoshop with Healing Brush
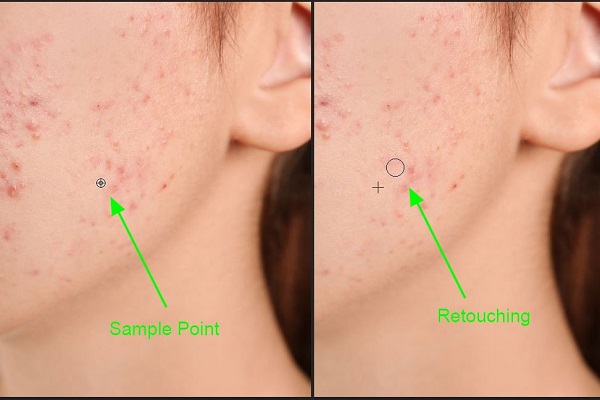
this part of the tutorial on how to remove facial acne in Photoshop is dedicated to photos that need deeper retouching. The main difference between the Healing Brush tool and the Spot Healing Brush is that when using the Healing Brush, you must select a sample point that Photoshop will use to replace the selected pixels.

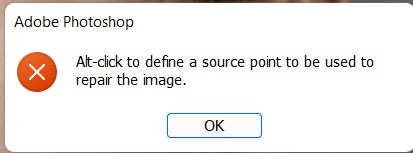
Once the Healing Brush tool is selected, you cannot simply click on the area that needs retouching. Photoshop prompts you to select a source point. Photoshop then blends the sampled pixels into the area you are retouching.
To select the source point, hold Alt (Windows) or Option (Mac) and click a part of the image. When selecting a source point, it is best to sample an area as close to the spot as possible. This causes the area to remain the same in terms of tone, luminance, and shade.
Once you’ve selected the source point, release the Alt/Option key and the cursor will look like a regular brush again. Increase or decrease the size of the brush to retouch larger areas.
There are several settings in the Options Bar when retouching parts of a photo with the Healing Brush tool.
![]()
The Mode options specify how the new pixels will be blended into the area you are retouching. When removing pimples, it is recommended to use Normal or Screen.
You can then select a source that points to the sampled pixels. Select Sampled to select a sample point from the image. The Pattern option allows you to select a pattern as the sample point.
![]()
The Aligned option controls whether your sample area will move as the cursor moves.
![]()
The Diffusion option determines how quickly new pixels adapt to the surrounding environment. When retouching images with grainy textures, keep the Diffusion value low. When the image you are retouching is completely flat, keep the Diffusion value high.
![]()
How to remove facial acne in Photoshop with Healing Brush
But if you are not satisfied with the Spot Healing Brush tool, you can use the Healing Brush tool. After opening the photo, click on the Add Layer icon at the bottom of the Layers panel to create a new layer.
You can select the Healing Brush tool by clicking and holding the mouse on the Spot Healing Brush.

When you select the Healing Brush tool, make sure the Mode is set to Normal, the Source is set to Sampled, and the Sample is set to All Layers.
![]()
Now press the Alt key and click to select the appropriate area of skin in your photo. This tool uses the smooth and transparent part of the skin to cover pimples and blemishes. It is better to use the transparent part of the skin closest to the point you are retouching.
Erase a small area at a time to make sure the sample point is close to the spots you are retouching.
Repeat these steps until all the pimples are gone. The skin will remain red in some areas, but you can fix it with the next step.
To organize the Layers panel, double-click on the desired layer and assign a suitable name to it.
The next step is smoothing the skin. To do this, we need to copy both layers that we have. You can do this with Ctrl+J on Windows and Command+J on Mac.
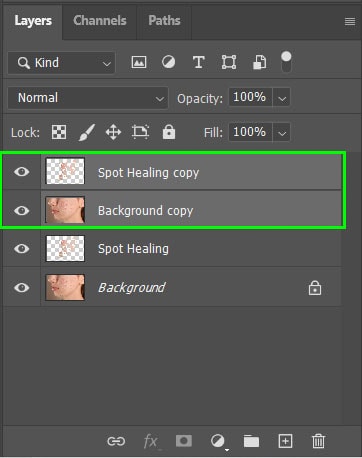
With the two duplicated layers selected, press Control + E (Win) or Command + E (Mac) to merge the layers. Then, with the merged layer selected, press Control + J (Win) or Command + J (Mac) to copy the merged layer.
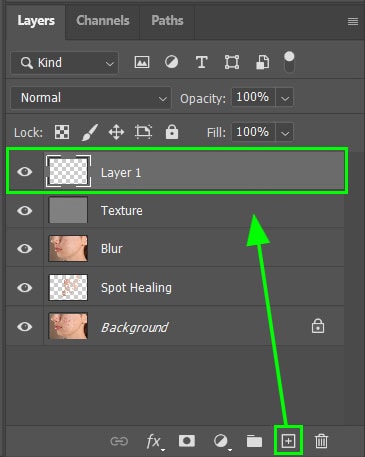
You should have two new copy layers on top of the Background layer and the Spot Healing layer you created earlier.

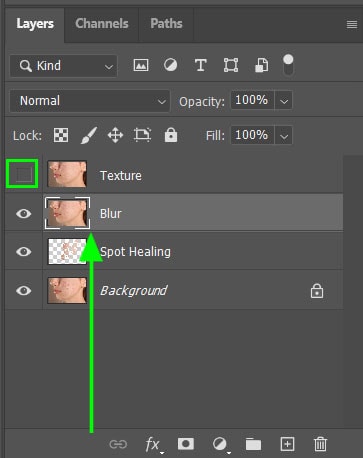
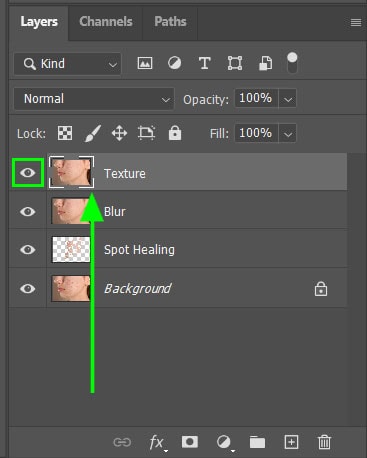
Rename the two new layers to Blur (bottom layer) and Texture (top layer). Then hide the upper layer by clicking on the eye icon next to the image. Now click on the Blur Layer to select it.
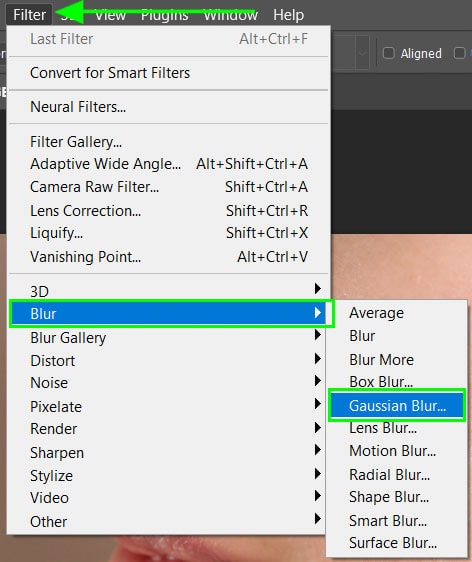
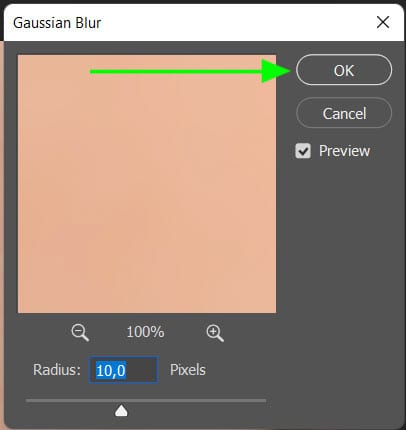
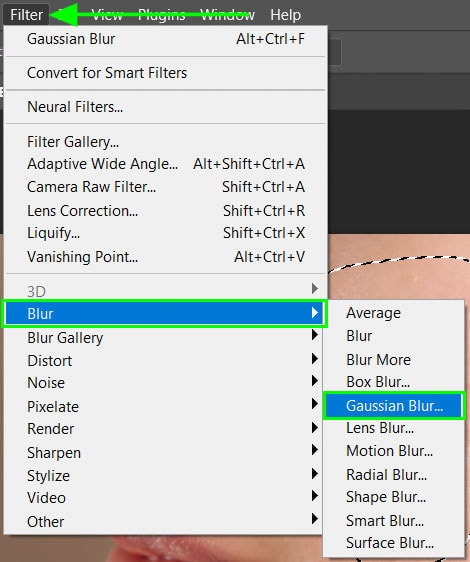
Add a blur to the Blur layer by going to Filter > Blur > Gaussian Blur.
When the Gaussian Blur window opens, click the box next to the preview and add enough blur to soften the skin by adjusting the slider at the bottom of the window. Be careful not to overdo it as this will make the image look unrealistic.
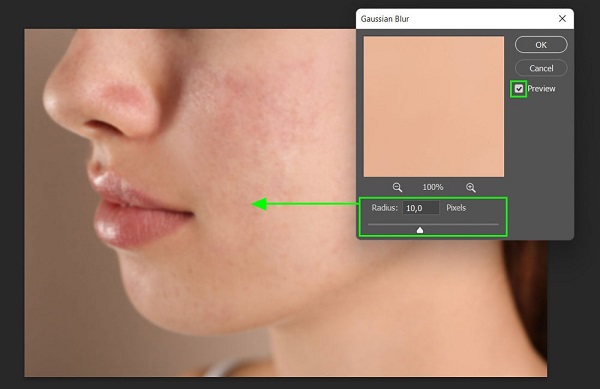
When you’ve added the right amount of blur for your image, click OK.
Then, enable the visibility of the Texture layer by checking the box next to the layer thumbnail. Then click on the Texture layer to select it.
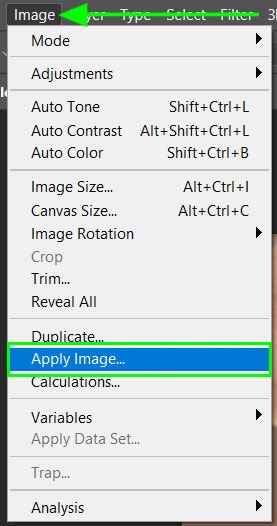
Go to Image > Apply Image.
After the Apply Image window opens, apply the following settings before pressing OK.
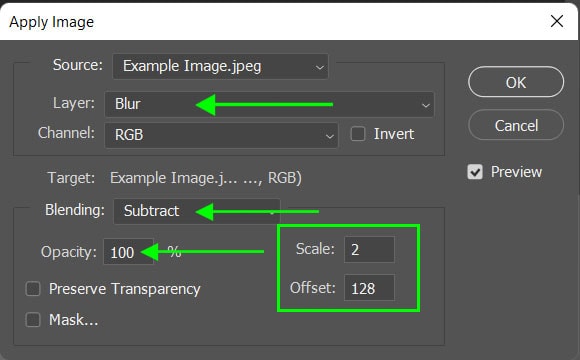
Change the layer to Blur layer.
Set Blending to Subtract.
Set Scale to 2
Set Offset to 128.
Change the Opacity to 100%.
After applying these settings, the image should be completely gray.

Change the blend mode of the Texture layer by selecting the Mode drop-down menu in the Layers panel and selecting Linear Light.


Now click again on the Blur layer and select Lasso from the toolbar or press the L key. Use this tool to select photos.

From the settings, set the Feather option between 10 and 20 pixels.

Now drag the mouse over the area where you can remove the redness of the skin.

Then go to Filter > Blur > Gaussian Blur and use the slider to smooth the skin. Click OK when you find the right value for you

Press Control + D (Win) or Command + D (Mac) to deselect the selected area. Repeat these steps until you get smooth and even skin.
Create a new layer to add more softness and smoothness to the skin.
Select Brush from the toolbar or press the B key and set the Blend Mode to Lighten and the Opacity between 10% and 40%.

![]()
Then, by holding the Alt (Windows) or Option (Mac) key, select an area of the image to be used as a sample. This point should not be read. Then move the mouse over the red areas. Release the Alt or Option key when you are done.
Removing welds in Photoshop with the Patch Tool
But if you want to remove spots and pimples from a larger area of the skin, you can use the Patch Tool. First, press Ctrl + Alt + Shift + E keys together to create a merged layer. This step is necessary for the Patch Tool to work properly.
After that, use the Patch Tool to select the area of the skin that has the pimple. After selecting, click inside the selected area and drag your mouse outside the area. When you do this you can see that the area is filled with a piece of surrounding skin. If you are satisfied with the created situation, just release the mouse button.
How to remove facial acne in the photo? with the Clone Stamp Tool
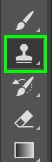
As the name Clone Stamp Tool suggests, this tool copies part of the image and pastes it on another part of the image. The Clone Stamp Tool can be used to copy objects in an image or cover blemishes and blemishes. This tool can be activated from the toolbar or by pressing the S key.
You can select a sample point by pressing the Alt key on Windows or the Option key on Mac, and then apply it to the areas you want to delete. However, the Clone Stamp Tool will not merge the sampled pixels into the new area and you will have an exact copy of the sample.
It is better to use a soft brush to blend the pixels well. When using this tool you can see various settings, you can change the Blend Mode to change the way the brush blends the pixels and by adjusting the Opacity you can change the transparency of the cloned pixels in the new area.

The Flow option determines how fast or slow the pixels will be reeled in during retouching. This option should be set to 100% when using this tool to retouch spots and pimples.
Check the box next to Aligned to have Photoshop continuously sample pixels based on the first sample point. Uncheck Aligned to use the original sample point every time you retouch an area.
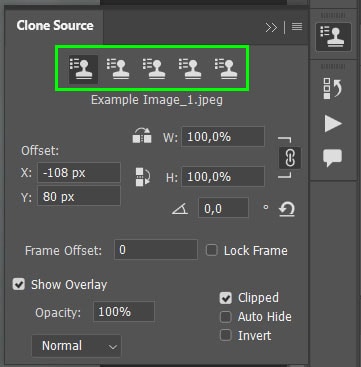
![]()
The Clone Stamp tool offers more options in the Clone Stamp panel. One of the main options here is that you can set up to five sample points. You can switch between these sample points while using the tool to speed up your workflow.
Removing skin spots in Photoshop with the Skin Smoothing filter
You can use the Skin Smoothing filter to remove facial acne with Photoshop. Adobe introduced this filter in October 2022 with the release of Adobe Photoshop 22.0. Skin Smoothing increases skin blurring and removes some sharp shadows and uses Content Aware to create more realistic skin. Photoshop may not completely erase facial acne, but it still makes a huge difference to the original photo.
Open the photo you want in Photoshop.
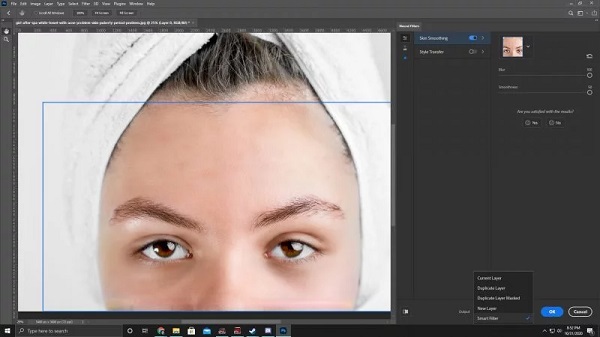
Go to Filter > Neural Filters.
This will open your neural filter panel on the right side of Photoshop. Select Skin Smoothing.

The Blur slider can be adjusted from 0 to 100%, with a default value of 50%. Adjust this slider to change the amount of blur on the subject’s face.

You can change the Smoothness slider from minus 50 to plus 50 to remove harsh tones and contrast.

After you get the result you want, click OK.

Work output:
Your comments and suggestions?
In the video tutorial of 5 ways to remove and eliminate pimples in Photoshop today, we have explained various solutions to you. If you have missed a point, know another solution, or have an opinion or suggestion, you can share it with us in the comments section of this article.