
If you come across the error message “A Software Update is Required to Use this Startup Disk” on your computer, it can cause a great deal of frustration. However, there’s no need to worry, as we are here to help you fix this issue and get your system up and running again. This error message typically appears when your computer’s operating system is outdated and incompatible with the latest security updates. To resolve this issue, you will need to perform a software update on your computer.
Steps to Easily Fix A Software Update is Required to Use this Startup Disk
Every user has their own method to Easily Fix A Software Update Required to Use this Startup Disk. In our case, I have used the below methods to fix the error. It may not be helpful to you, and it is advisable that you check other websites if this article is not helpful to you.
1. Sign out from Beta Program
If you have enrolled in the beta program for your macOS Ventura, you may encounter an error message saying “A Software Update is Required to Use this Startup Disk”. This message is displayed because the operating software is being verified for its legitimacy, and if there’s an issue with the verification process, your Mac will display this message. To resolve this issue, you can follow a few steps.
Firstly, check your internet connection to ensure that it is working properly. Sometimes, the verification process can fail due to an unstable or weak internet connection. If the internet connection is the problem, try resetting your network settings or connecting to a different Wi-Fi network.
If your internet connection is not the issue, you may need to unenroll from the Beta program. This is because the Beta program is a testing program for software developers, and the operating software may not be fully stable or compatible with your Mac.
To unenroll from the Beta program, go to the System Preferences in your Mac and click on Software Update. From there, click on the “Details” button, and you should see an option to “Restore Defaults” or “Stop Beta Program Updates“. Click on this option, and your Mac should stop receiving Beta updates.

2. Restore Startup Security to Default Settings
Every Mac has a safety feature called Startup Security Utility, which is running in full security mode to protect your device. Due to this security feature, your Mac is unable to recognize the new operating system, macOS Ventura.
1. Boot to Recovery Mode
You’ll need to follow a few steps to ensure your device is working properly and has the right settings. First, you’ll need to enter recovery mode. This will allow you to check everything and make any necessary changes to how your device starts up. It’s an important step to keep your device running smoothly!
It’s worth noting that the process of entering Recovery mode on Mac computers that use Intel processors is different from the process on those that use Apple’s powerful M1 and M2 processors. On Intel-based Macs, you need to hold down the Command and R keys during startup, which will take you to the macOS Utilities window.
In contrast, M1 and M2 Macs have a new feature called Startup Manager, which allows you to enter Recovery mode by holding down the power button until the startup options appear. From there, you can select the Recovery mode option to access the macOS Utilities window.
Note: If you have been using Disk Utility to clean your hard disk on a Mac, it’s important to note that doing so may prevent you from entering recovery mode. This can be a problem if you need to troubleshoot or fix issues with your Mac’s operating system. In such a scenario, you must enter Internet recovery mode, which requires an internet connection.
To enter Internet recovery mode on your Mac, press the Option-Command-R or Shift-Option-Command-R keys on your keyboard during startup. This will initiate the internet recovery and allow you to access the macOS Utilities screen. From here, you can perform various actions such as reinstalling macOS, restoring data from a Time Machine backup, or using Disk Utility to repair your disk.
It’s important to note that if you have a slow or unreliable internet connection, the internet recovery process may take longer than usual or fail altogether. Therefore, ensuring your Mac is connected to a stable and fast internet connection is advisable before attempting Internet recovery mode.
2. Configure Secure Boot Settings
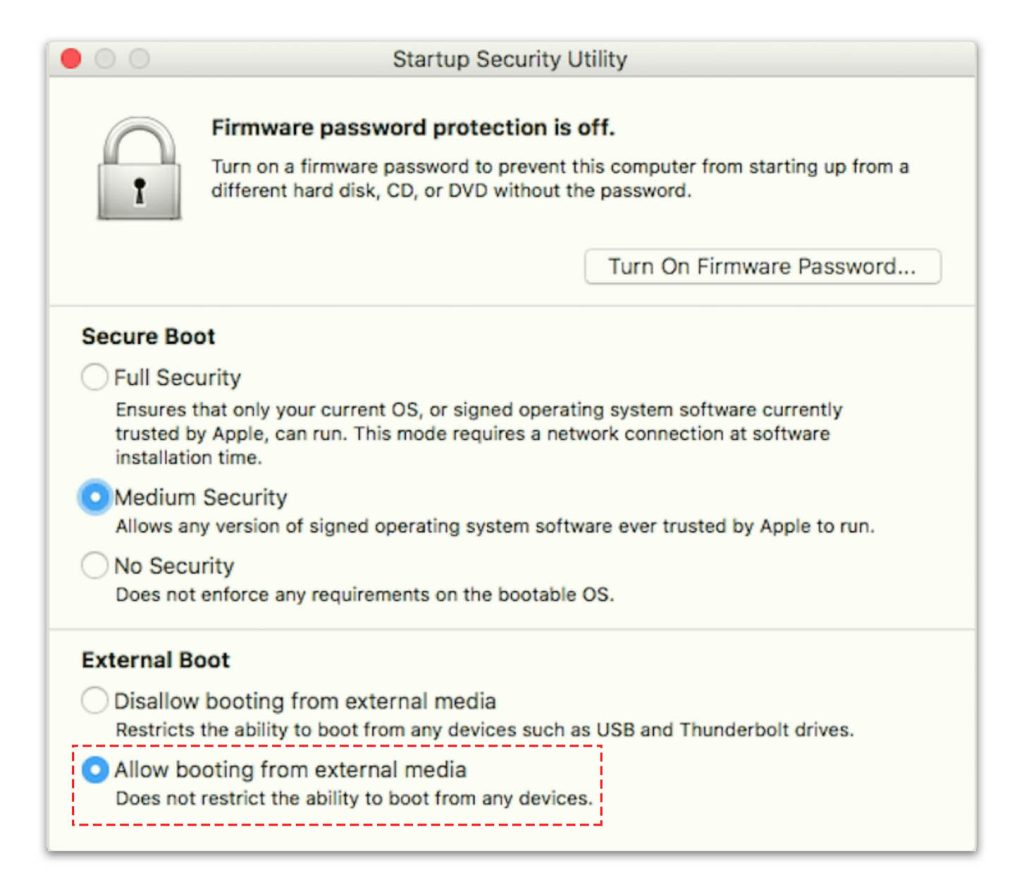
When your Mac is experiencing issues and won’t start up properly, you can access the Recovery mode to troubleshoot and fix the problem. To do so, restart your Mac and immediately hold down the Command and R keys until the Apple logo appears. Once in Recovery mode, click on the “Utilities” menu and select “Startup Security Utility”.
In the Startup Security Utility window, you will see the default settings for your Mac’s startup security. Here, you need to change the settings to allow your Mac to use a USB external disk as a startup disk. To do this, click on the “Allow booting from external media” checkbox.
Additionally, you should disable the “Verify Security” option to avoid any potential issues with the operating system verification process. This will allow your Mac to boot up faster and more efficiently. Once you have made these changes, click on the “Restart” button to apply the new settings and exit the Startup Security Utility.

3. Install macOS Using Terminal
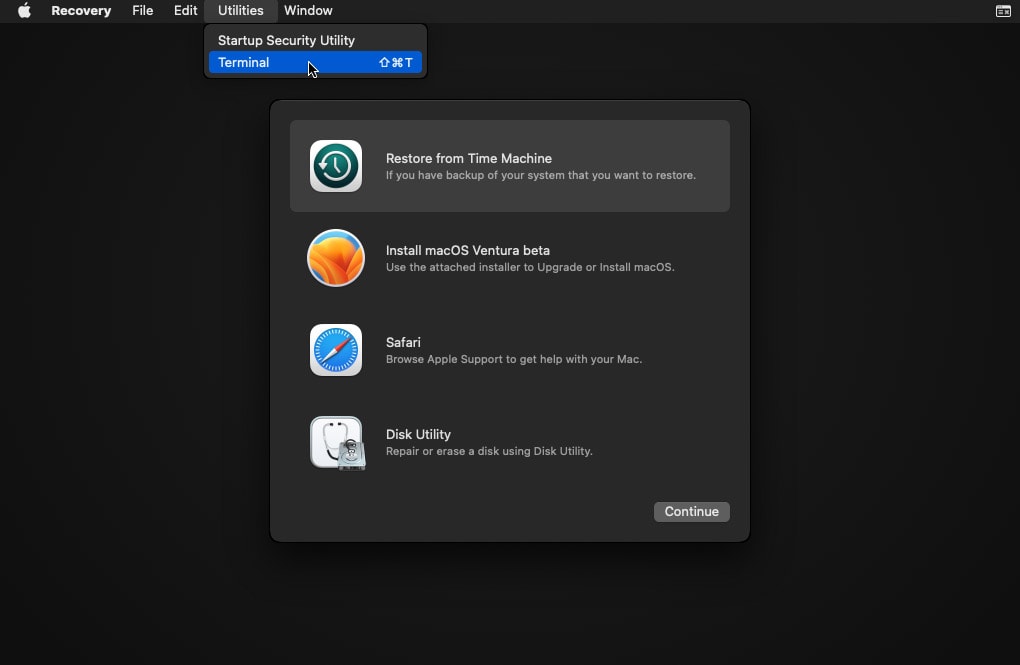
First, you’ll need to access Recovery Mode on your device. Once you’re there, you can use Terminal to complete the installation process. To begin, locate the installassistant file that can be found in Install macOS Ventura.app. Then, in Terminal, run the command to execute the installassistant file and initiate the installation process. This will guide you through the setup process, and you’ll be on your way to using macOS Ventura in no time.
The steps of How to Install macOS using Terminal are mentioned below:
- Launch the Terminal from the startup recovery settings under the Utilities in recovery mode.
- Followed by, you need to make sure that you have attached a bootable USB of macOS to your mac.
- Following that, launch type diskutil list in the terminal to show all the available disks. The purpose of using diskutil list is to Locate the appropriate macOS installer depending on your operating system.
- After you found the location, you have to execute the this /Volumes/Install\ macOS\ Ventura\ beta/Install\ macOS\ Ventura\ beta.app/Contents/MacOS/InstallAssistant_springboard command.
- To open the InstallAssistant for macOS Ventura, you can use a command if the installer is still present in the Applications folder on your macOS disk. (/Volumes/Macintosh/Applications\Install\ macOS\ Ventura\ beta.app/Contents/MacOS/InstallAssistant_springboard)

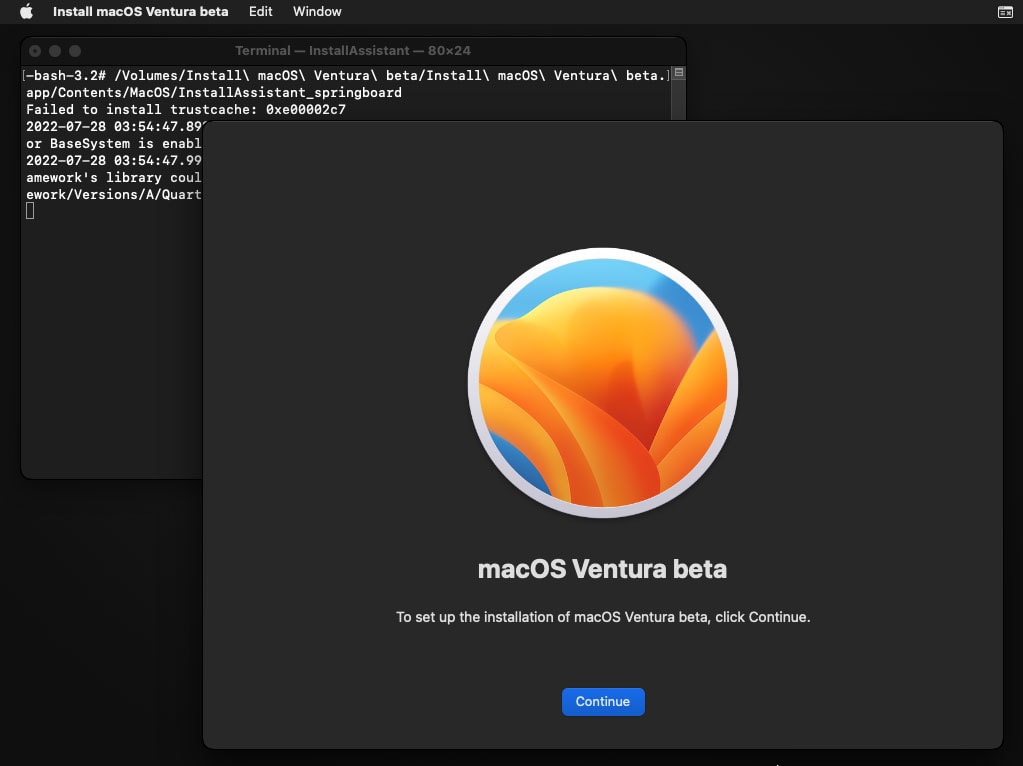
Connect to the internet after activating the installer. A good internet connection is necessary to avoid installation errors. Click Continue and select your disk to install macOS Ventura or Monterey. If you face any issues during the installation, leave a comment below, and we’ll help you resolve it.
One Comment