
How to insert a photo in Word
You may need to insert a photo in Word to include a graph or a result of an experiment or modeling, or even for your class research. Your description will be more complete by placing a photo. If you are not yet familiar with how to insert a photo in Word, don’t worry, just use one of the following methods.
Adding a photo in Word
To add a photo in Word, click on the place you want. The cursor should appear as a flashing vertical bar at this point. When you insert the photo, the bottom corner of the zip will be at this point.

This method works for all modern versions of Word (2016 and up).
Go to the Insert tab. This tab is located between Home and Design (or Draw).

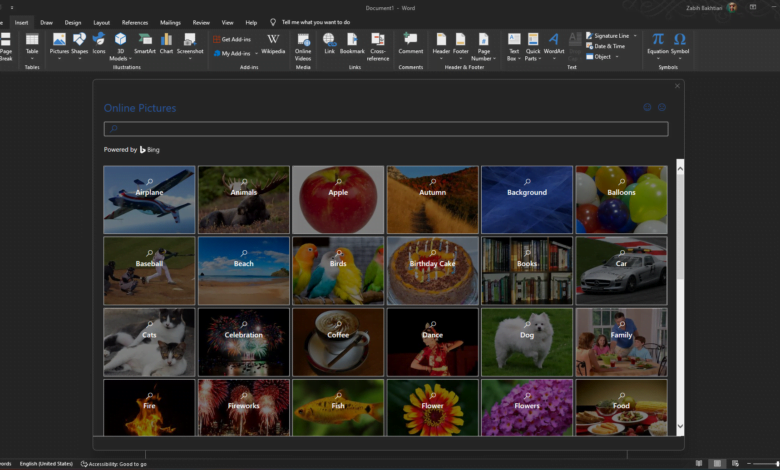
Click on the Pictures tool. This tool is in the Illustrations section of the tool that is located at the top of your login page. If you are using Word 2019 or above, a menu will open. If you are using Word 2016 or older versions, your file browser will appear.

Now you need to specify the type of photo you want to add to Word. You can choose a photo from the system, or you can choose a photo from the Internet, and you can even use a stock photo in the Microsoft collection.

For Word 2019 or newer, click on one of the options below:
This Device: To add a picture of the system
Stock Images: To select a photo from the Microsoft collection
Online Pictures: To find and add a picture from the Internet

For Word 2016, proceed as follows:

If the image is on your system, simply select it through your file browser.
If you want to search for a photo online or import a photo from Facebook or Flickr or OneDrive, close the file browser and click the Online Pictures icon and then Browse.
Select the photo you want to insert. Once you find the photo, click it once to select it.
If you have selected from stock photos or online images, you can click on multiple photos to add more than one photo.
If you are selecting files from your system and want to add more than one photo, hold down the Ctrl key and click on each photo.

Resize a photo in Word: If you want to resize a photo, click once to select it, and then drag any of the corner circles in or out.

If you want, you can define the size. Double-click on the picture to open the Picture Format tab and then set the desired sizes in Height and Width.
Use the arrow above the image to rotate the image in Word. Place the mouse pointer on the curved arrow and then click and drag the pointer left or right.

Double-click the photo to access more editing tools. With this, the Picture Format header (in Word 2019 and later) or Format (in Word 2016) opens at the top of the entry. In this header, you can:

In the Arrange panel in the upper right part, click on Wrap Text and change the layout of the photo in Word.

The Adjust panel provides you with more tools to remove the background and color effects.
You can use Picture Styles in the Format bar to add a border or frame around your photo.

How to put pictures in Word Mac
To put a picture in Word Mac, we do as follows:
Click on the location of your login document where you want to place the photo.

Go to the Insert tab (located between Home and Design or Home and Draw tabs).

Click on the photo icon. This icon is located between Tables and Shapes.
Click on Photo Browser or Picture from File. If you want to browse photos in your Mac’s Photos app, use Photo Browser. To select a picture file using the Finder, select Picture from File.

Insert the photo into your Word document. If you’re using the Photo Browser option, simply drag the photo into your document. If you are using Picture from File, select the photo and click Insert.

If you want to reduce or enlarge the photo, resize it. Hold the Shift key and drag the size handles in or out to keep the image aspect ratio so it doesn’t stretch.

To keep the center of the photo fixed while resizing, hold down the Option key while dragging the handles.
You can also define a size. Double-click the picture to open the Picture Format tab. Now enter the desired sizes in Height and Width.
Drag the curved arrow above the image to rotate the image.

Double-click on the photo to access more editing tools. This will open the Picture Format tab at the top of the entry, which includes a set of editing features, including the ability to remove the background and add styles.

Click Corrections to correct lighting and color problems.
Artistic Effects is for adding filters and Transparency is for making the photo transparent.
You can use the Crop tool to crop the photo.
With Wrap Text, you can choose how to place images in text blocks and use Align and Position to ensure correct placement.
Click Quick Styles to select pre-designed borders, shadows, and other options.
If you find that you have added the wrong pictures to your document, you can delete individual or all pictures in Word.
How to put a picture in Word?
To insert a photo in Word for the web, click on the place in your document where you want to insert the photo.
If this is the first time you are using Office online, go to office.com Sign in with your Microsoft account and select Word to start.

Click on Insert. This will open the Insert tab.

Click on Pictures to bring up a drop-down menu. There are 4 options to choose from:
This Device: Select the photo from the system.
OneDrive: Select the photo from your OneDrive.
Stock Image: Insert a photo or sticker from the Microsoft collection
Bing Pictures: Search for a picture on Bing
Select an image. If you select the This Device option, you will be prompted to select an image from your system. Click on it to select.
Click Open.
Resize the photo if necessary If you want to resize the photo, click it once to select the photo and then drag any of the corner circles in or out.

If you want, you can also specify the size. Double-click on the picture to open the Picture tab at the top and then set the desired dimensions in Height and Width.
Use the curved arrow above the image to rotate it. The top of the dot is in the top center of the image. To rotate, place the mouse pointer over the curved arrow and then click and drag the pointer left or right until you are satisfied.

Double-click the image to access more editing tools. This opens the Picture tab at the top of Word for the web. In this tab, you can:

Click Wrap Text to choose how the image wraps around the text blocks. You can also set alignment preferences here.
To crop the image, click on the Crop tool in the “Image Size” panel in the upper right corner.
You can also select Picture Styles to add a border around the photo.
How to put pictures in Word by copying and pasting
To put images in Word by copying and pasting, we proceed as follows:
Find the photo you want to copy. This photo can be on the web, in another document, or in your photo collection.
Right-click on the photo.
Click on Copy.

Right-click on your Word document and select Paste.

To move a picture in Word, you need to click on the picture and keep your hand on the mouse and drag it to another place.
Putting pictures in Word by dragging and dropping
Find the photo you want to add.
Click on the photo file and keep your hand on the mouse button.

Grab it and drag it and drop it in the Word document of the game you have.

To move a picture in Word, you need to click on the picture and keep your hand on the mouse and drag it to another place. Note that when performing the above steps, you may encounter the problem of not opening the photo in Word. This problem can occur due to improper settings, which we discussed earlier about the steps to fix the problem.
With the spread of technology, many people use PDF files to transfer various documents. If you have a PDF file and you want to delete one or more pages from this file, there are various free tools to help you.


